By Tech Powered Dad | January 23, 2014
Math team season is upon us. I had an unusually large number of kids try out, and even after cuts, we had a record number of kids on the team, 32. When the start of the season nears, one of my preseason jobs is to get the team TI-Nspire CAS handhelds out of the closet, both to update to the latest OS, and to make sure they all still boot up. My students take great care of their Nspires, but we were early adopters, so our original TI-Nspire clickpads are coming up on 6 years old, and I’m always a little nervous during this process.
Yesterday, despite changing batteries a couple of times, 3 of my old TI-Nspire clickpads would not power up. With so many kids on the team this year, I can’t afford to have that many CAS’s out of commission. Since the math team budget at our school is zero, I have to fund raise for every calculator we buy, and I can’t just magically produce a few more.
With these CAS’s refusing to turn on and being years beyond their warranty, I figured I had nothing to lose by opening them up to see if I could find the source of the problem myself. I’m far from an electrical guru, but I thought maybe I could get lucky and the problem would obvious. In fact, after a little bit of investigating, I did figure out the problem.
DISCLAIMER: To be clear, I’m NOT suggesting this as a solution to anyone else. I’m certain this is not a Texas Instruments approved solution, and if your Nspire is still under warranty, I’ll be this this will void it (if you are still under warranty, call them up at 1-800-TI-CARES; they will fix it for you). I also don’t know if this will work for anyone else. You could cause further damage via this process. It may have been a stroke of luck that this worked on 2 of my 3 TI-Nspire CAS’s. With all that said, if you’re curious about what worked for me, feel free to read on.
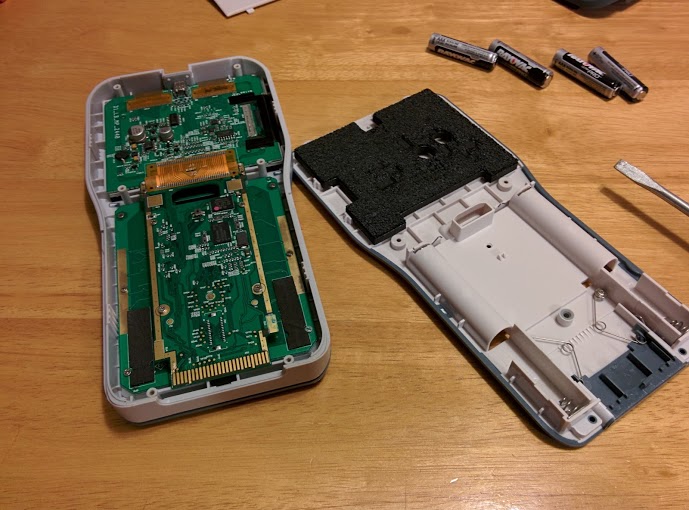
As I said, I’m not an electrical expert, so I’ll be using layman’s terms here. I started by removing the 6 screws on the back of the Nspire CAS. I didn’t have a star head screwdriver small enough, so I actually had to use a specialty drill bit that I had which was a perfect fit. Next I gently pried the front and back halves apart, allowing me to see the inner parts of the Nspire.

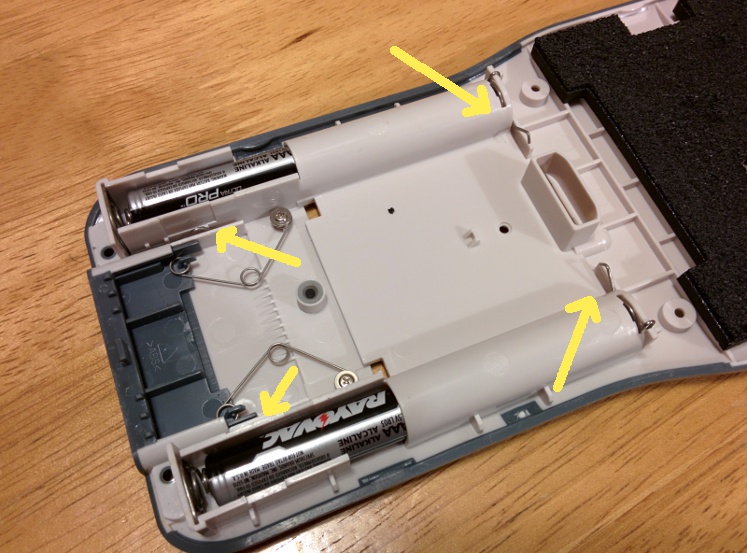
I was operating on the assumption that somehow the circuit formed when I insert the batteries might be broken. If the problem was bigger than that, I probably wouldn’t be able to fix it anyway. What I realized was that there are 4 metal wire clips that come from the battery compartment on one half of the Nspire and make contact with 4 tiny metal plates on the other half of the Nspire.
 Here are the 4 metal clips. The view of the lower left one is obscured by the battery compartment.
It appeared that, through the years, the metal wire clips have actually rubbed clear through the metal plates to the plastic on the other side, breaking the circuit. To test this theory, I actually inserted a small piece of aluminum foil over the plate, closed the Nspire CAS back up, and attempted to start it again. Sure enough, it started on the very first try.
 4 metal pads where contact occurs, especially note the hole worn in the lower right one.
Clearly, aluminum foil is not a long term solution to this problem, but a tiny amount of solder is. I just added a bit of solder from a soldering iron to each of the metal plates where the clips had worn through to plastic, and two of the TI-Nspire CAS’s were up and running again. The third one remains stubbornly powered down. If I ever find a solution, I’ll be sure to update this post.

